Email Success Modal Tutorial
I did Frontend Mentor’s ‘Newsletter sign-up’ challenge. It’s a single-page form that checks your email and, when it’s valid, flips to a little ‘Thanks for subscribing!’ card. I wrote the layout in HTML, styled it with SCSS (so I could nest and organize the CSS faster), and used a few lines of vanilla JavaScript to stop the page reload, show any errors, and swap the views. It’s a good next-step project once you’re comfortable with the basics but not yet using frameworks. I want to explain how to do it as a tutorial here.
Tutorial: Building a Newsletter Sign-Up Form with a Success Message
This tutorial walks you through creating a newsletter sign-up form that validates the user’s email and shows a success message modal.
We’ll cover:
- Setting up the HTML structure (form + modal).
- Styling everything with CSS/SCSS.
- Adding JavaScript logic for validation and interactivity.
So, to begin, we’ll build this project in three stages:
- HTML structure
- CSS/SCSS styling
- JavaScript interactivity
The HTML Structure
The HTML has two main parts:
- The newsletter form (what users see first).
- The success modal (hidden at first, shown only when the email is valid).
First, create a file called index.html.
This will hold the structure of our page.
In index.html, type the html code that is below.
The html below will have two main sections:
.container→ the newsletter form..email-modal→ the success popup (hidden at first).
Inside of the form we have:
- An email input (
input type="email") so the browser knows to expect an email. - A button to submit.
- A hidden error message (
.invalidEmail) that we’ll show with JavaScript if the email is invalid.
Here is the success modal, written at the start of the html just after the <body> tag:
<body>
   <!-- Success Message (hidden initially) -->
  <div class="email-modal">
    <div class="email-modal__container--content">
      <img src="assets/images/icon-success.svg" alt="success icon">
      <h1>Thanks for subscribing!</h1>
      <p>A confirmation email has been sent to <span class="user-email">ash@lorecompany.com</span>.</p>
      <button class="email-modal__close">Dismiss message</button>
    </div>
  </div>
Code language: HTML, XML (xml)
Finish the html and add the main newsletter form
 <!-- Newsletter Form -->
  <div class="container">
    <div class="container__form--left">
      <h1>Stay Updated!</h1>
      <p>Join 60,000+ product managers receiving monthly updates on:</p>

      <!-- A few list items -->
      <ul>
        <li><img src="assets/images/icon-list.svg"> Product discovery and building what matters</li>
        <li><img src="assets/images/icon-list.svg"> Measuring to ensure updates are a success</li>
        <li><img src="assets/images/icon-list.svg"> And much more!</li>
      </ul>

      <!-- The sign-up form -->
      <form>
        <div class="form-header">
        <p>Email address</p>
        <p class="invalidEmail">Valid email required</p>
        </div>
        <input type="text" class="email-input" placeholder="email@company.com" required>
        <button type="submit" class="subscribe-button">Subscribe to monthly newsletter</button>
      </form>
    </div>

    <!-- Right side illustration -->
    <div class="container__form--right">
      <img src="assets/images/illustration-sign-up-desktop.svg">
    </div>
  </div>

  <script src="assets/js/app.js"></script>
</body>Code language: HTML, XML (xml)
Great ! We are done writing the html. You should see all of the html(including the success modal) unstyled for now. Here are some key points to notice:
.email-modalis hidden by default with CSS (display: none)..invalidEmailis the error message shown only when validation fails.- The
formhas aninputfor the email and abuttonto submit.
Now let’s do the styling with SCSS
We’ll use variables, nesting, and partial-like organization.
Create a file called main.scss
lets do the nesting in this file.
let us create the variables first:
// ----------------------------
// Variables
// ----------------------------
$DarkSlateGrey: hsl(234, 29%, 20%);
$CharcoalGrey: hsl(235, 18%, 26%);
$Grey: hsl(231, 7%, 60%);
$Tomato: hsl(4, 100%, 67%);
$White: hsl(0, 0%, 100%);Code language: SCSS (scss)
and don’t forget that we always need to do a css reset:
// ----------------------------
// Reset
// ----------------------------
* {
  margin: 0;
  padding: 0;
  box-sizing: border-box;
}Code language: SCSS (scss)
let’s do some universal styling in the in the body:
body {
  font-family: 'Roboto', sans-serif;
  background-color: $CharcoalGrey;
  display: flex;
  justify-content: center;
  align-items: center;
  min-height: 100vh;
}Code language: SCSS (scss)
Now let’s style the newsletter form:
// ----------------------------
// Container Layout
// ----------------------------
.container {
  display: flex;
  background: $White;
  border-radius: 20px;
  overflow: hidden;
  width: 800px;
  max-width: 95%;

  &__form--left {
    flex: 1;
    padding: 2rem;

    h1 {
      font-size: 2rem;
      margin-bottom: 1rem;
      color: $DarkSlateGrey;
    }

    p {
      margin-bottom: 1rem;
      color: $DarkSlateGrey;
    }

    ul {
      margin-bottom: 2rem;

      li {
        display: flex;
        align-items: center;
        margin-bottom: 0.5rem;

        img {
          margin-right: 0.5rem;
        }
      }
    }

    form {
      display: flex;
      flex-direction: column;

      .form-header {
        display: flex;
        justify-content: space-between;
        align-items: center;

        .invalidEmail {
          color: $Tomato;
          display: none;
          font-size: 0.8rem;
        }
      }

      .email-input {
        padding: 0.8rem;
        border: 1px solid $Grey;
        border-radius: 5px;
        margin-bottom: 1rem;

        &.error {
          border-color: $Tomato;
          background-color: lighten($Tomato, 40%);
        }
      }

      .subscribe-button {
        padding: 0.8rem;
        border: none;
        border-radius: 5px;
        background-color: $DarkSlateGrey;
        color: $White;
        font-weight: bold;
        cursor: pointer;

        &:hover {
          background-color: $Tomato;
        }
      }
    }
  }

  &__form--right {
    img {
      width: 100%;
      height: auto;
    }
  }
}

// ----------------------------
// Success Modal
// ----------------------------

.email-modal {
  display:none; //hidden by default
  background: $White;
  padding: 2rem;
  border-radius: 20px;
  text-align: center;
  max-width: 400px;

  img {
    width: 50px;
    margin-bottom: 1rem;
  }

  h1 {
    margin-bottom: 1rem;
    color: $DarkSlateGrey;
  }

  p {
    color: $DarkSlateGrey;

    span {
      font-weight: bold;
    }
  }

  &__close {
    margin-top: 1rem;
    padding: 0.8rem;
    border: none;
    border-radius: 5px;
    background-color: $DarkSlateGrey;
    color: $White;
    font-weight: bold;
    cursor: pointer;

    &:hover {
      background-color: $Tomato;
    }
  }
}Code language: PHP (php)
It is time to make the form work !
let’s prepare the JavaScript.
create a file called app.js
type this code to prepare to manipulate the DOM:
document.addEventListener('DOMContentLoaded', function() {
  // your JS code here
});Code language: JavaScript (javascript)
What It Means
document→ refers to the entire HTML document (the web page)..addEventListener('DOMContentLoaded', …)→ tells the browser:
“Run this code only after the HTML has finished loading and is ready to be worked with.”function() { … }→ this is the callback (the code that will run once the event happens).
Here’s a little bit more about DOMContentLoaded and why it is needed:
Imagine your script tries to grab something like:
const emailInput = document.querySelector('.email-input');
Code language: JavaScript (javascript)
If this line runs before the browser has loaded the HTML, then .email-input doesn’t exist yet → you’d get null.
Wrapping your code inside DOMContentLoaded ensures that all elements are available in the DOM before your JS starts running.
When does it fire?
DOMContentLoadedfires as soon as the HTML is fully parsed (but before images, CSS, etc. finish loading).- This makes it faster than
window.onload, which waits for everything (images, fonts, etc.) to load.
In short it is just a safety wrapper that says: “Don’t run my JavaScript until the HTML document is ready.”
let’s select some important elements from the html:
document.addEventListener('DOMContentLoaded', function() {
  // Select important elements
    const form = document.querySelector('form');
    const emailInput = document.querySelector('.email-input');
    const invalidEmail = document.querySelector('.invalidEmail');
    const modal = document.querySelector('.email-modal');
    const userEmailSpan = document.querySelector('.user-email');
    const closeBtn = document.querySelector('.email-modal__close');
    const container = document.querySelector('.container');
});Code language: JavaScript (javascript)
I can explain each selection in detail here:
- const form = document.querySelector(‘form’);
This grabs the first<form>element on the page.
Now you can listen for things like form submissions. - const emailInput = document.querySelector(‘.email-input’);
This selects the<input>where the user types their email. - const invalidEmail = document.querySelector(‘.invalidEmail’);
This is the error message span/paragraph that shows up when the email is invalid. - const modal = document.querySelector(‘.email-modal’);
This points to the success modal (the popup after a valid submission). - const userEmailSpan = document.querySelector(‘.user-email’);
This is the span inside the modal where we display the user’s email. - const closeBtn = document.querySelector(‘.email-modal__close’);
This is the “Dismiss message” button in the modal. - const container = document.querySelector(‘.container’);
This is the main page content wrapper.
So here is the big picture:
This whole block is basically collecting references to important elements in your HTML so JavaScript can “talk to” them later:
- Form → listen for submission
- Email input → check what the user typed
- Invalid email text → show/hide error
- Modal → show/hide success message
- User email span → inject user’s email
- Close button → close the modal
- Container → hide page content when modal is visible
Let’s write the email validator function now:
document.addEventListener('DOMContentLoaded', function() {
  // Select important elements
    const form = document.querySelector('form');
    const emailInput = document.querySelector('.email-input');
    const invalidEmail = document.querySelector('.invalidEmail');
    const modal = document.querySelector('.email-modal');
    const userEmailSpan = document.querySelector('.user-email');
    const closeBtn = document.querySelector('.email-modal__close');
    const container = document.querySelector('.container');

 // Function to check if email is valid
    function emailValid(email) {
        return /\S+@\S+\.\S+/.test(email);
    }
});Code language: JavaScript (javascript)
Here is what is happening:
function emailValid(email) → creates a function named emailValid that takes one argument (email = the text the user typed into the input box).
Inside, it uses a regular expression (regex):
/\S+@\S+\.\S+/
And then runs .test(email) → which checks whether the given email matches that regex pattern.
- If it matches →
true - If it doesn’t →
false
What does the regex /\S+@\S+\.\S+/ mean?
/ ... /→ regex pattern\S+→ one or more non-whitespace characters (so no spaces allowed)@→ must contain an at symbol\S+→ more non-whitespace characters after the@\.→ a literal dot (the\escapes it so it’s treated as a dot, not “any character”)\S+→ one or more non-whitespace characters after the dot
So, in plain English: “This string must have some text, then an @, then more text, then a ., then more text — all without spaces.”
Now let’s write the code that is the glue between the user’s action (submitting the form) and all the JavaScript logic we wrote.
add the eventlistener below to app.js now.
form.addEventListener('submit', (e) => {
  // your code runs here when the form is submitted
});

Code language: PHP (php)
Let me explain this part of the code.
We previously grabbed the form with:
const form = document.querySelector('form');
Code language: JavaScript (javascript)
Now we’re saying: “Hey form, whenever someone submits you (by pressing Enter or clicking the submit button), run this function.”
The (e) => { … }
(e)→ this is the event object, automatically passed in. It holds info about what happened (like which element triggered the event, if Ctrl was pressed, etc.).- Commonly, we call
e.preventDefault();inside — which stops the browser from doing its default action (reloading the page when a form submits). Let’s do that now.
add this code inside of the function, like so:
/ Handle form submit
    form.addEventListener('submit', (e) => {
        e.preventDefault(); // Prevent form from submitting; stop page refresh


    });Code language: PHP (php)
Now let’s write the heart of the form logic. The code below decides:
- ✅ What happens when the email is valid
- ❌ What happens when the email is invalid
add this block of code to the function:
if (emailValid(emailInput.value)) {
    // Hide error
    invalidEmail.style.display = 'none';

    // Show modal
    modal.style.display = 'block';
    container.style.display = 'none';

    // Insert user's email into modal
    userEmailSpan.textContent = emailInput.value;

} else {
    // Show error
    invalidEmail.style.display = 'block';
    emailInput.style.borderColor = 'hsl(4, 100%, 67%)';
    emailInput.style.backgroundColor = '#ffe8e6';
}
Code language: JavaScript (javascript)
Let me explain:
if (emailValid(emailInput.value))Code language: CSS (css)emailInput.value→ whatever the user typed in the email box.emailValid(...)→ our helper function using regex (/\S+@\S+\.\S+/) to check if it looks like an email.
In a nutshell this line of code is saying: “If the user’s email looks valid, run the success case. Otherwise, run the error case.”
Now let’s look at the success case
invalidEmail.style.display = 'none';
Code language: JavaScript (javascript)- Hides the red error message (“Valid email required”).
modal.style.display = 'block';
container.style.display = 'none';
Code language: JavaScript (javascript)- Hides the form (
.container) - Shows the success message modal (
.email-modal).
userEmailSpan.textContent = emailInput.value;
- Inserts the user’s actual email into the modal text.
- So instead of a generic message, they see:
- “A confirmation email has been sent to youremail@example.com”
invalidEmail.style.display = 'block';
Code language: JavaScript (javascript)- Shows the red error text under the input (“Valid email required”).
emailInput.style.borderColor = 'hsl(4, 100%, 67%)';
emailInput.style.backgroundColor = '#ffe8e6';
Code language: JavaScript (javascript)- Visually highlights the input box with a red border and light red background.
- This is a common error feedback pattern: “You typed something wrong, fix it.”
In plain English, the code above means:
When the user clicks Subscribe:
If the email looks valid: hide the error, show the success modal, and display their email inside it. If the email is invalid: show the error message + style the input box red so the user knows where the problem is.
finally, put this code into app.js:
// Handle close modal
    closeBtn.addEventListener('click', () => {
        modal.style.display = 'none';
        container.style.display = 'flex';
        emailInput.value = '';
        emailInput.style.borderColor = 'hsl(231, 7%, 60%)';
        emailInput.style.backgroundColor = 'white';
    });Code language: PHP (php)
This block of code is all about resetting the UI when the user closes the success message modal. Let me break it done for you.
closeBtn.addEventListener('click', …)Code language: JavaScript (javascript)closeBtn= the “Dismiss message” button inside the modal.- When the user clicks it → run this arrow function.
modal.style.display = 'none';
Code language: JavaScript (javascript)- hides the modal
- → The success message (
.email-modal) disappears.
container.style.display = 'flex';
Code language: JavaScript (javascript)- shows the form again
- → The main sign-up form (
.container) comes back, so the user can subscribe again (or with a different email).
emailInput.value = '';
Code language: JavaScript (javascript)- this clears the input box
- → The email field is emptied out.
- This makes it feel like a “fresh form” instead of keeping the old email.
emailInput.style.borderColor = 'hsl(231, 7%, 60%)';
emailInput.style.backgroundColor = 'white';
Code language: JavaScript (javascript)- This resets the input styles
- → Removes the error highlight (if there was one).
- → Returns the input box to its default neutral look.
So just to give a summary:
When the user dismisses the success message:
- Hide the modal
- Show the form again
- Reset the email field and its styling
Basically, this button resets the app back to its starting state so the user can try again if they want.
That’s it. This is our newsletter sign-up form. All of the code can be seen below:
THE HTML:
<body>
   <!-- Success Message (hidden initially) -->
  <div class="email-modal">
    <div class="email-modal__container--content">
      <img src="assets/images/icon-success.svg" alt="success icon">
      <h1>Thanks for subscribing!</h1>
      <p>A confirmation email has been sent to <span class="user-email">ash@lorecompany.com</span>.</p>
      <button class="email-modal__close">Dismiss message</button>
    </div>
  </div>
  <!-- Newsletter Form -->
  <div class="container">
    <div class="container__form--left">
      <h1>Stay Updated!</h1>
      <p>Join 60,000+ product managers receiving monthly updates on:</p>

      <!-- A few list items -->
      <ul>
        <li><img src="assets/images/icon-list.svg"> Product discovery and building what matters</li>
        <li><img src="assets/images/icon-list.svg"> Measuring to ensure updates are a success</li>
        <li><img src="assets/images/icon-list.svg"> And much more!</li>
      </ul>

      <!-- The sign-up form -->
      <form>
        <div class="form-header">
        <p>Email address</p>
        <p class="invalidEmail">Valid email required</p>
        </div>
        <input type="text" class="email-input" placeholder="email@company.com" required>
        <button type="submit" class="subscribe-button">Subscribe to monthly newsletter</button>
      </form>
    </div>

    <!-- Right side illustration -->
    <div class="container__form--right">
      <img src="assets/images/illustration-sign-up-desktop.svg">
    </div>
  </div>

  <script src="assets/js/app.js"></script>
</body>Code language: HTML, XML (xml)
THE SCSS:
// ----------------------------
// Variables
// ----------------------------
$DarkSlateGrey: hsl(234, 29%, 20%);
$CharcoalGrey: hsl(235, 18%, 26%);
$Grey: hsl(231, 7%, 60%);
$Tomato: hsl(4, 100%, 67%);
$White: hsl(0, 0%, 100%);

// ----------------------------
// Reset
// ----------------------------
* {
  margin: 0;
  padding: 0;
  box-sizing: border-box;
}

body {
  font-family: 'Roboto', sans-serif;
  background-color: $CharcoalGrey;
  display: flex;
  justify-content: center;
  align-items: center;
  min-height: 100vh;
}

// ----------------------------
// Container Layout
// ----------------------------
.container {
  display: flex;
  background: $White;
  border-radius: 20px;
  overflow: hidden;
  width: 800px;
  max-width: 95%;

  &__form--left {
    flex: 1;
    padding: 2rem;

    h1 {
      font-size: 2rem;
      margin-bottom: 1rem;
      color: $DarkSlateGrey;
    }

    p {
      margin-bottom: 1rem;
      color: $DarkSlateGrey;
    }

    ul {
      margin-bottom: 2rem;

      li {
        display: flex;
        align-items: center;
        margin-bottom: 0.5rem;

        img {
          margin-right: 0.5rem;
        }
      }
    }

    form {
      display: flex;
      flex-direction: column;

      .form-header {
        display: flex;
        justify-content: space-between;
        align-items: center;

        .invalidEmail {
          color: $Tomato;
          display: none;
          font-size: 0.8rem;
        }
      }

      .email-input {
        padding: 0.8rem;
        border: 1px solid $Grey;
        border-radius: 5px;
        margin-bottom: 1rem;

        &.error {
          border-color: $Tomato;
          background-color: lighten($Tomato, 40%);
        }
      }

      .subscribe-button {
        padding: 0.8rem;
        border: none;
        border-radius: 5px;
        background-color: $DarkSlateGrey;
        color: $White;
        font-weight: bold;
        cursor: pointer;

        &:hover {
          background-color: $Tomato;
        }
      }
    }
  }

  &__form--right {
    img {
      width: 100%;
      height: auto;
    }
  }
}

// ----------------------------
// Success Modal
// ----------------------------

.email-modal {
  display:none; //hidden by default
  background: $White;
  padding: 2rem;
  border-radius: 20px;
  text-align: center;
  max-width: 400px;

  img {
    width: 50px;
    margin-bottom: 1rem;
  }

  h1 {
    margin-bottom: 1rem;
    color: $DarkSlateGrey;
  }

  p {
    color: $DarkSlateGrey;

    span {
      font-weight: bold;
    }
  }

  &__close {
    margin-top: 1rem;
    padding: 0.8rem;
    border: none;
    border-radius: 5px;
    background-color: $DarkSlateGrey;
    color: $White;
    font-weight: bold;
    cursor: pointer;

    &:hover {
      background-color: $Tomato;
    }
  }
}


Code language: PHP (php)
THE JAVASCRIPT:
document.addEventListener('DOMContentLoaded', function() {
    // Select important elements
    const form = document.querySelector('form');
    const emailInput = document.querySelector('.email-input');
    const invalidEmail = document.querySelector('.invalidEmail');
    const modal = document.querySelector('.email-modal');
    const userEmailSpan = document.querySelector('.user-email');
    const closeBtn = document.querySelector('.email-modal__close');
    const container = document.querySelector('.container');

    // Function to check if email is valid
    function emailValid(email) {
        return /\S+@\S+\.\S+/.test(email);
    }

    // Handle form submit
    form.addEventListener('submit', (e) => {
        e.preventDefault(); // Prevent form from submitting; stop page refresh

        if (emailValid(emailInput.value)) {
            //Hide error
            invalidEmail.style.display = 'none';

            // Show modal
            modal.style.display = 'block';
            container.style.display = 'none';

            // Insert user's email into modal
            userEmailSpan.textContent = emailInput.value;

        } else {
            // Show error
            invalidEmail.style.display = 'block';
            emailInput.style.borderColor = 'hsl(4, 100%, 67%)';
            emailInput.style.backgroundColor = '#ffe8e6';
        }
    });

    // Handle close modal
    closeBtn.addEventListener('click', () => {
        modal.style.display = 'none';
        container.style.display = 'flex';
        emailInput.value = '';
        emailInput.style.borderColor = 'hsl(231, 7%, 60%)';
        emailInput.style.backgroundColor = 'white';
    });

});Code language: JavaScript (javascript)
lastly. I forgot to mention that we need to make the form responsive. Put the following code into the bottom of main.scss:
/***THE MEDIA QUERIES***/
@media only screen and (max-width: 1440px) {
.container {
display: flex;
margin-top: 1.333rem;
width: 60%;
background-color: white;
border-radius: 30px;
}
.container__form--right {
width: 50%;
}
.container__form--left {
padding: 2rem;
font-weight: 400;
color: var(--CharcoalGrey);
width: 50%;
padding: 2rem;
}
.container__form--left--header {
h1 {
font-size: 3.6rem;
font-weight: 700;
color: var(--DarkSlateGrey);
margin-bottom: 1.5rem;
font-weight: 700;
}
p {
margin-bottom: 1.5rem;
}
}
.container__form--left--list {
margin-bottom: 2rem;
li {
display: flex;
margin-bottom: 1rem;
p {
margin-left: 1rem;
}
}
}
.container__form--left--form {
p {
color: var(--CharcoalGrey);
font-weight: 700;
margin-bottom: 0.5rem;
}
form {
display: flex;
flex-direction: column;
label {
font-weight: 700;
margin-bottom: 0.5rem;
}
input {
border: 1px solid var(--Grey);
border-radius: 5px;
padding: 0.9rem;
margin-bottom: 1.5rem;
width: 100%;
}
button {
border-radius: 5px;
padding: 0.9rem;
background-color: var(--DarkSlateGrey);
font-weight: 700;
color: white;
border: none;
cursor: pointer;
width: 100%;
}
}
}
.container__form--right {
padding: 1rem;
img {
width: 100%;
}
}
}
@media only screen and (max-width: 1416px) {
.container {
display: flex;
margin-top: 1.333rem;
width: 60%;
background-color: white;
border-radius: 30px;
}
.container__form--right {
width: 50%;
}
.container__form--left {
padding: 2rem;
font-weight: 400;
color: var(--CharcoalGrey);
width: 50%;
padding: 2rem;
}
.container__form--left--header {
h1 {
font-size: 2.9rem;
font-weight: 700;
color: var(--DarkSlateGrey);
margin-bottom: 1.5rem;
}
p {
margin-bottom: 1.5rem;
font-size: 0.84rem;
}
}
.container__form--left--list {
margin-bottom: 2rem;
li {
display: flex;
margin-bottom: 1rem;
p {
margin-left: 1rem;
font-size: 0.83rem;
}
}
}
.container__form--left--form {
p {
color: var(--CharcoalGrey);
font-weight: 700;
margin-bottom: 0.5rem;
}
form {
display: flex;
flex-direction: column;
label {
font-weight: 700;
margin-bottom: 0.5rem;
}
input {
border: 1px solid var(--Grey);
border-radius: 5px;
padding: 0.9rem;
margin-bottom: 1.5rem;
width: 100%;
}
button {
border-radius: 5px;
padding: 0.9rem;
background-color: var(--DarkSlateGrey);
font-weight: 700;
color: white;
border: none;
cursor: pointer;
width: 100%;
}
}
}
.container__form--right {
padding: 1rem;
img {
width: 100%;
}
}
}
/******TABLET******/
@media only screen and (max-width: 1023px) {
body {
background-color: white;
display: flex;
}
.container {
display: flex;
flex-direction: column;
justify-content: center;
align-items: center;
margin-top: 1.333rem;
width: 100%;
background-color: white;
border-radius: 30px;
.logoimg {
width: 100%;
padding: 0;
margin-top: -1.3rem;
display: flex;
}
}
.container__form--right {
width: 100%;
}
.container__form--left {
padding: 2rem;
font-weight: 400;
color: var(--CharcoalGrey);
width: 100%;
padding: 2rem;
}
.container__form--right {
padding: 0;
img {
display: none;
}
}
}
/******MOBILE******/
@media only screen and (max-width: 768px) {
body {
background-color: white;
display: flex;
}
.container {
display: flex;
flex-direction: column;
justify-content: center;
align-items: center;
margin-top: 1.333rem;
width: 100%;
background-color: white;
border-radius: 30px;
.logoimg {
width: 100%;
padding: 0;
margin-top: -1.3rem;
display: flex;
}
}
.container__form--right {
width: 100%;
}
.container__form--left {
padding: 2rem;
font-weight: 400;
color: var(--CharcoalGrey);
width: 100%;
padding: 2rem;
}
.container__form--right {
padding: 0;
img {
display: none;
}
}
.email-modal__close {
margin-top: 10rem;
}
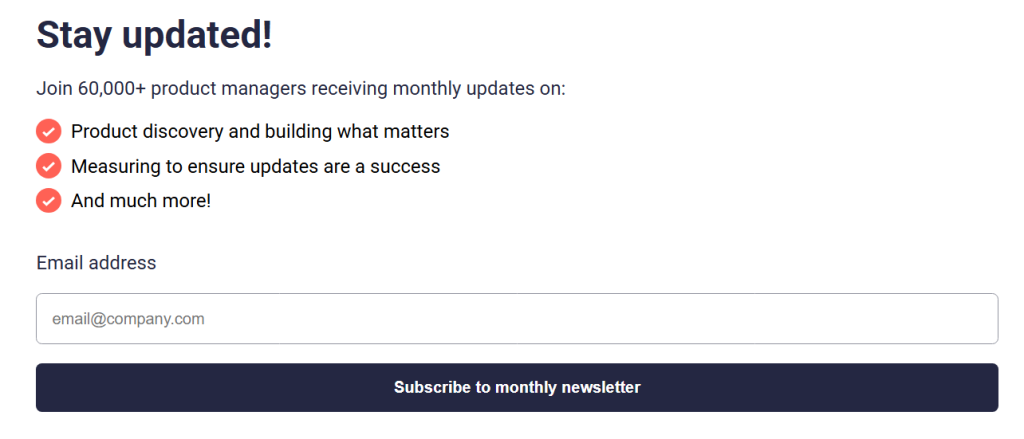
}Code language: PHP (php)This is the page on desktop:

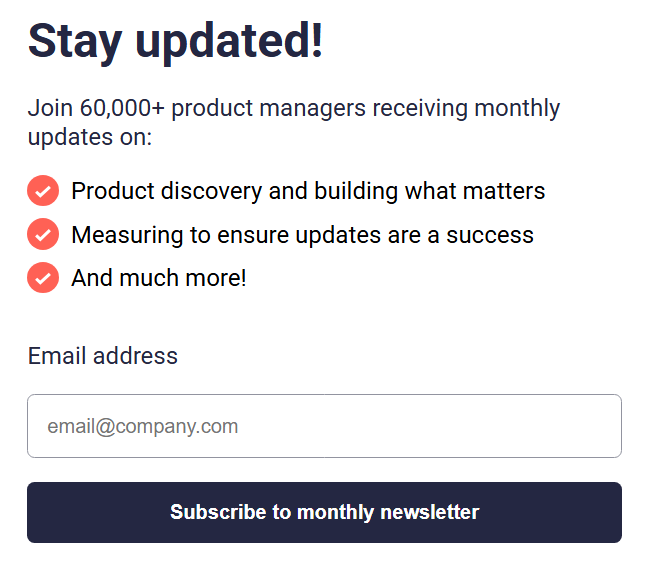
This is the tablet version:
and this is the mobile version:
Thank you for tuning in.